Fast Track Basement System Installation Guide

The SMARTER basement waterproofing system that SAVES TIME, which SAVES MONEY.
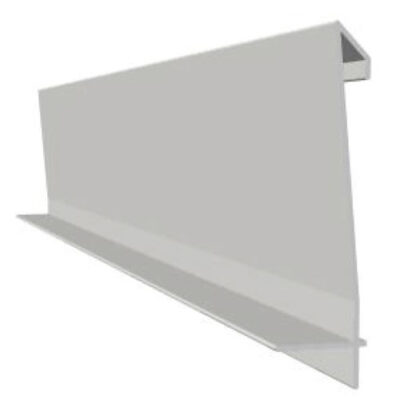
Fast Track Basement System our most versatile basement waterproofing system. Fast Track is a hybrid, new generation drain tile. Fast Track Basement System requires half the work of drain tile and runs faster and more efficiently. Never use old-fashioned pipe and gravel again with Fast Track’s innovate design. Fast Track’s unique design allows it to be installed next to the footing, like drain tile, or on top of the footing. When installing next to footing use Drain-Eze XL black dimpled board. When installing on top of footing use Rim-Skirt.
Fast Track Installation On Top Of Footing (with the Drain-Eze XL):

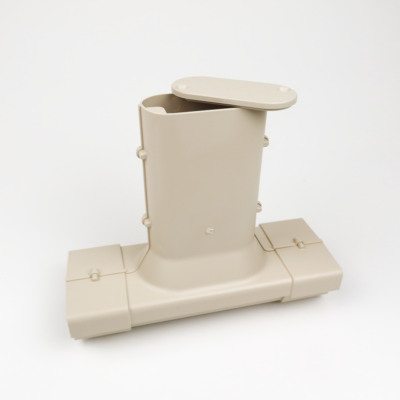
Step 1: Install sump basin in desired location and cut holes for 4″ round Fast Track sump drop connection. Starting at the sump, remove concrete floor on top of footing and 6″ past footing and 4″ deep.

Step 2: For block wall foundations, drill weep holes into empty cells in the bottom row of blocks 1/2″ to 1″ above footing. No weep holes needed for poured wall foundations.

Step 3: Before pouring rock into trench, dig out 2″ of dirt under existing concrete floor to then fill with rock. This will help prevent moisture wicking between the concrete seams.

Step 4: Pour pea rock into the trench. Grade the rock to pitch the Fast Track main sections toward the sump pump system.

Step 5: Starting at basin, lay Fast Track channel next to footer slit-side down. Top of channel should be flush with the top of footer. Pitch Fast Track channel 1/4″ every 10 feet toward sump pump system.

Step 6: Connect Fast Track channel sections together using the snap joints to create a rigid continuous channel.

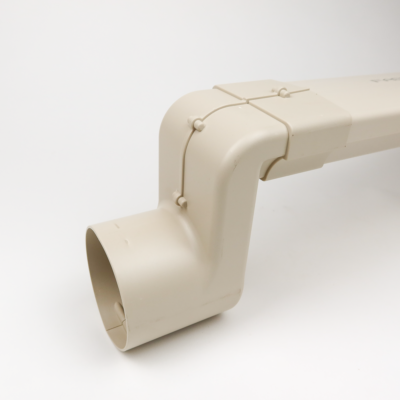
Step 7: Use Fast Track universal corners for 90-degree turns. Universal corners can be used as an inside or outside corner.

Step 8: Install inspection ports on the opposite side of the basement as the sump pump system. Large basements install multiple ports. Once concrete is poured, cut top of ports flush and screw on caps.

Step 9: Install Drain-Eze sections on top of footing overlapping end-to-end. Elongated slots go up wall and dimples across the
footing.

Step 10: Tack the Drain-Eze XL into place with 1-2 concrete nails, which will prevent the Drain-Eze XL from moving will pouring the trowling the concrete. You will see small round recesses in the vertical slotted section of the Drain-Eze XL to indicate where to tack the concrete nails into so they will be below the new concrete when poured.

Step 11: Install Fast Track tee between 2 main sections next to the sump pit. Use a small section of the Fast Track channel to direct the tee out to the pit and connect the Fast Track sump drop to the end. This drops down the level of the system and converts the opening to a 4-inch round to connect directly into the side of the sump basin.

Step 12: Pour additional pea gravel into trench to the top of the Fast Track channel. Next, pour concrete to replace floor. Avoid pouring into inspection ports.
Fast Track Installation On Top Of Footing (with the Rim-Skirt):
Follow steps 1 through 4 above, then continue below. Note, you will not need to remove as much concrete or trench next to the footing when installing the Fast Track on top of the footing.

Step 5: After exposing the footing and 2 inches out from the footing, set the Fast Track on top of footing. Follow with the Rim-Skirt nesting overtop of the Fast Track channel.
Step 6: Install snap-joints between Fast Track main sections, universial corners, inspection ports, tees, and sump drops as needed. As seen in steps 5 through 8 above.

Step 7: (see step 11 above) Install Fast Track tee between 2 main sections next to the sump pit. Use a small section of the Fast Track channel to direct the tee out to the pit and connect the Fast Track sump drop to the end. This drops down the level of the system and converts the opening to a 4-inch round to connect directly into the side of the sump basin. Then follow to step 12 above to finish installation.
Order Product
-
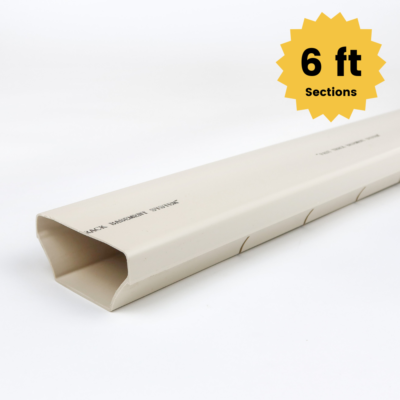
Fast Track Basement System 6ft Sections (90ft Cartons)
$287.80 Add to cart -

Fast Track: Snap Joiners (36 Pack)
$47.80 Add to cart -

Fast Track: Universal Corners (8 Pack)
$64.80 Add to cart -
Fast Track: Inspection Ports (4 Pack)
$59.80 Add to cart -
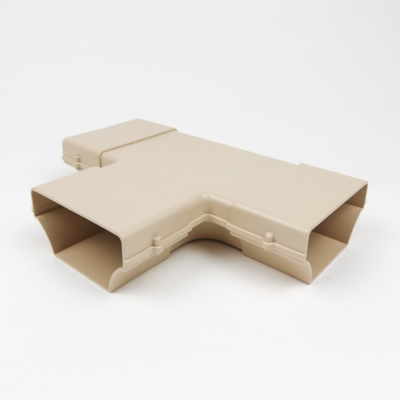
Fast Track: Tees (4 Pack)
$59.80 Add to cart -
Fast Track: Sump Drops (4 Pack)
$59.80 Add to cart -
Rim-Skirt Basement System 6ft Sections (180ft Cartons)
$299.80 Add to cart -

Drain-Eze XL Basement System 6ft Sections (180ft Cartons)
$529.80 Add to cart